
If you like Streamlit tutorials, I recommend you to check out my previous one
📸 Realtime Webcam Processing Using Streamlit and OpenCV.
This week I decided to create an app that uses GPT-4 Vision to generate descriptions of images based on the user’s prompt.
The app allows the user to upload multiple images and generate descriptions for all of them at once. Since the user can write the prompt, they can tailor the model’s output to their needs. For example, the user can ask the model to create:
- product descriptions
- captions for social media posts
- generate text for image alt tags
- extract the image text
Once the descriptions are generated, the user can download the descriptions along with the image names as a CSV file.
Let’s Build the App!
To create this application, I used the following requirements.txt file.
pandas==2.2.0
streamlit==1.31.0
openai==1.12.0
watchdog==4.0.0
To install the modules in your environment, you can use:
pip install -r requirements.txt
Now let’s dive into the implementation in three steps.
Setup the image uploader
The first step is to create a Streamlit app that allows the user to upload images. To do this, we can use the st.file_uploader method.
To make the app a little prettier, I also set the page title, icon, layout, and a sidebar using the method st.set_page_config.
To place the file uploader inside the sidebar, we put it within the with st.sidebar block.
import streamlit as st


st.set_page_config(
    page_title="Image to Text",
    page_icon="📝",
    layout="wide",
    initial_sidebar_state="expanded",
)

st.title("AI Image Description Generator 🤖✍️")

with st.sidebar:
    st.title("Upload Your Images")
    st.session_state.images = st.file_uploader(label=" ", accept_multiple_files=True)
The image below shows the app layout with the sidebar and the file uploader. The images uploaded by the user are stored in the st.session_state.images variable.
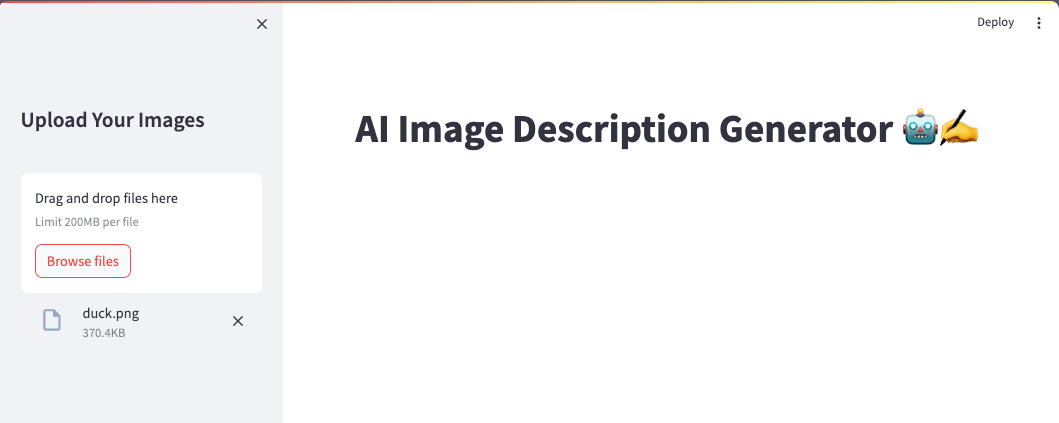 App layout with the sidebar and the file uploader.
Rendering the images in a table
Now we have the images at the server side. The next step is to display the images in a table along with their names and description that will be filled in by the model.
We will do that in 3 steps:
Step 1: Convert the images to base64 strings
When a user uploads an image, Streamlit stores the image in memory as a BytesIO object. To display the images in the table, we need to convert the BytesIO objects into base64 strings (source){:target=”_blank”}. For this conversion, we will use the function below.
import base64

def to_base64(uploaded_file):
    file_buffer = uploaded_file.read()
    b64 = base64.b64encode(file_buffer).decode()
    return f"data:image/png;base64,{b64}"
Step 2: Store the images in a DataFrame
Before rendering the images in a table, we need to store the images in a DataFrame. To do this, we will create a function to generate a DataFrame containing the columns image_id, image (the base64 encoded string), name, and description.
import pandas as pd

def generate_df():
    st.session_state.df = pd.DataFrame(
        {
            "image_id": [img.file_id for img in st.session_state.images],
            "image": [to_base64(img) for img in st.session_state.images],
            "name": [img.name for img in st.session_state.images],
            "description": [""] * len(st.session_state.images),
        }
    )
The generated DataFrame will be stored in the st.session_state.df variable, so we can access it later from other parts of the app.
Step 3: Render the DataFrame as a table
The last step is to render the images in a table using the st.data_editor widget. To make it simpler to generate the table in different situations, we will create a function called render_df.
def render_df():
    st.data_editor(
        st.session_state.df,
        column_config={
            "image": st.column_config.ImageColumn(
                "Preview Image", help="Image preview", width=100
            ),
            "name": st.column_config.Column("Name", help="Image name", width=200),
            "description": st.column_config.Column(
                "Description", help="Image description", width=800
            ),
        },
        hide_index=True,
        height=500,
        column_order=["image", "name", "description"],
        use_container_width=True,
    )

if st.session_state.images:
    generate_df()
    render_df()
The widget st.data_editor expects a few parameters. Most of them are self-explanatory, but I would like to highlight the parameters column_config.
The column_config parameter allows us to customize the table columns. For example, we are using the st.column_config.ImageColumn to display the images. You can find more information about the different column types here.
The column_order parameter allows us not only to define the order of the columns but also to hide some columns. In this case, we are hiding the image_id column.
The last section of the snippet is the responsible for checking if the images were uploaded and, if so, generating the DataFrame and rendering it as a table.
Now, let’s upload some images and see the result.
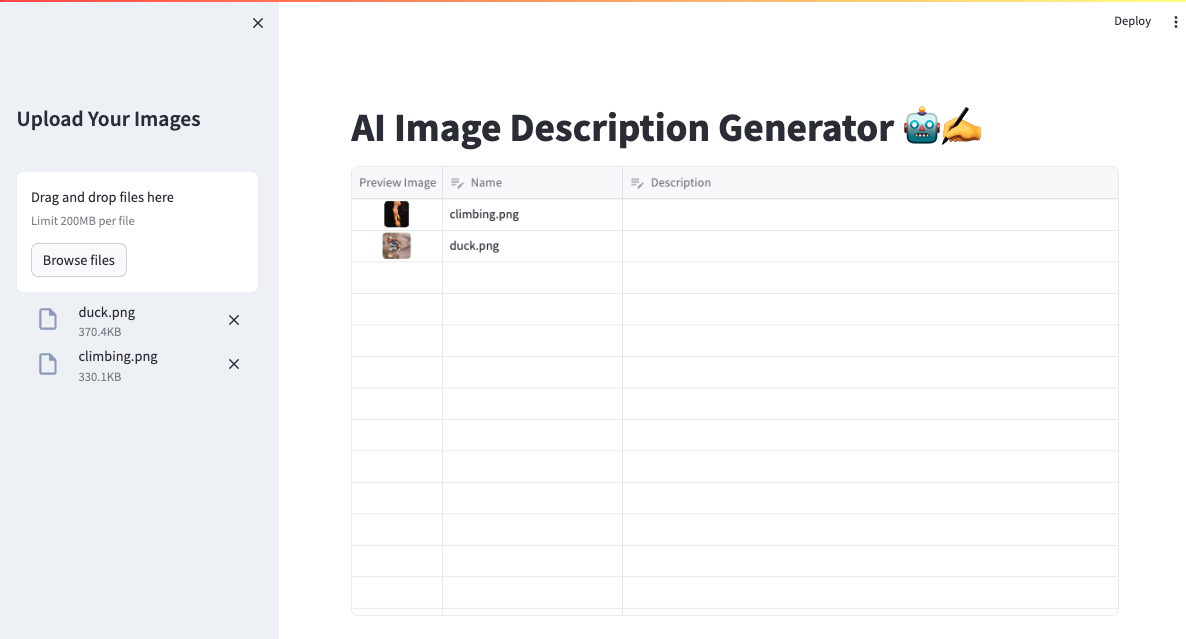 Displaying the uploaded images in a table.
Generate the image descriptions using GPT-4 Vision
For the next step, we will use the OpenAI GPT-4 Vision model to generate the image descriptions.
To use the model, you need an OpenAI API key. You can get one by signing up for the OpenAI API and then creating an API key in the API keys section. Once you have the key, set it to the environment variable OPENAI_API_KEY.
To consume the OpenAI API and generate the descriptions, we will create two functions: generate_description and update_df.
generate_description()
The function receives the image as a parameter and returns the description generated by the model. The prompt is passed to the API call via the variable st.session_state.text_prompt (which we will see later). Here, we hardcode the max_tokens to 50, but you can change it according to your needs.
def generate_description(image_base64):
    response = client.chat.completions.create(
        model="gpt-4-vision-preview",
        messages=[
            {
                "role": "user",
                "content": [
                    {"type": "text", "text": st.session_state.text_prompt},
                    {
                        "type": "image_url",
                        "image_url": {
                            "url": image_base64,
                        },
                    },
                ],
            }
        ],
        max_tokens=50,
    )
    return response.choices[0].message.content
update_df()
The update_df function uses the pandas apply method to apply the generate_description function to each row of the DataFrame.
The apply method passes the image column as a parameter to the generate_description function and stores the result in the description column.
def update_df():
    st.session_state.df["description"] = st.session_state.df["image"].apply(generate_description)
These two functions are enough to generate the descriptions for the images. The last step is to create a button to trigger the update_df function to generate the descriptions, and another button to download the descriptions as a CSV file.
Adding the action buttons and prompt field
The last step is to add the action buttons and the prompt field to the app. We will do that by modifying the section that checks if the images were uploaded (the one after the render_df section 😉).
if st.session_state.images:
    generate_df()

    st.text_input("Prompt", value="What's in this image?", key="text_prompt")

    col1, col2 = st.columns([1, 1])

    with col1:
        if st.button("Generate Image Descriptions", use_container_width=True):
            update_df()

    with col2:
        st.download_button(
                "Download descriptions as CSV",
                st.session_state.df.drop(['image', "image_id"],
                                         axis=1).to_csv(index=False),
                "descriptions.csv",
                "text/csv",
                use_container_width=True
        )

    render_df()
For the prompt field, we will use the st.text_input widget. The prompt will be stored in the st.session_state.text_prompt variable.
To make the buttons appear side by side, we will use st.columns.
In the first column, we will place the button to generate the descriptions. When the button is clicked, the update_df function will be called.
In the second column, we will place the button to download the descriptions as a CSV file. The button will use the st.download_button widget. To make the CSV file more user-friendly, we drop the image and image_id columns from the DataFrame before downloading it.
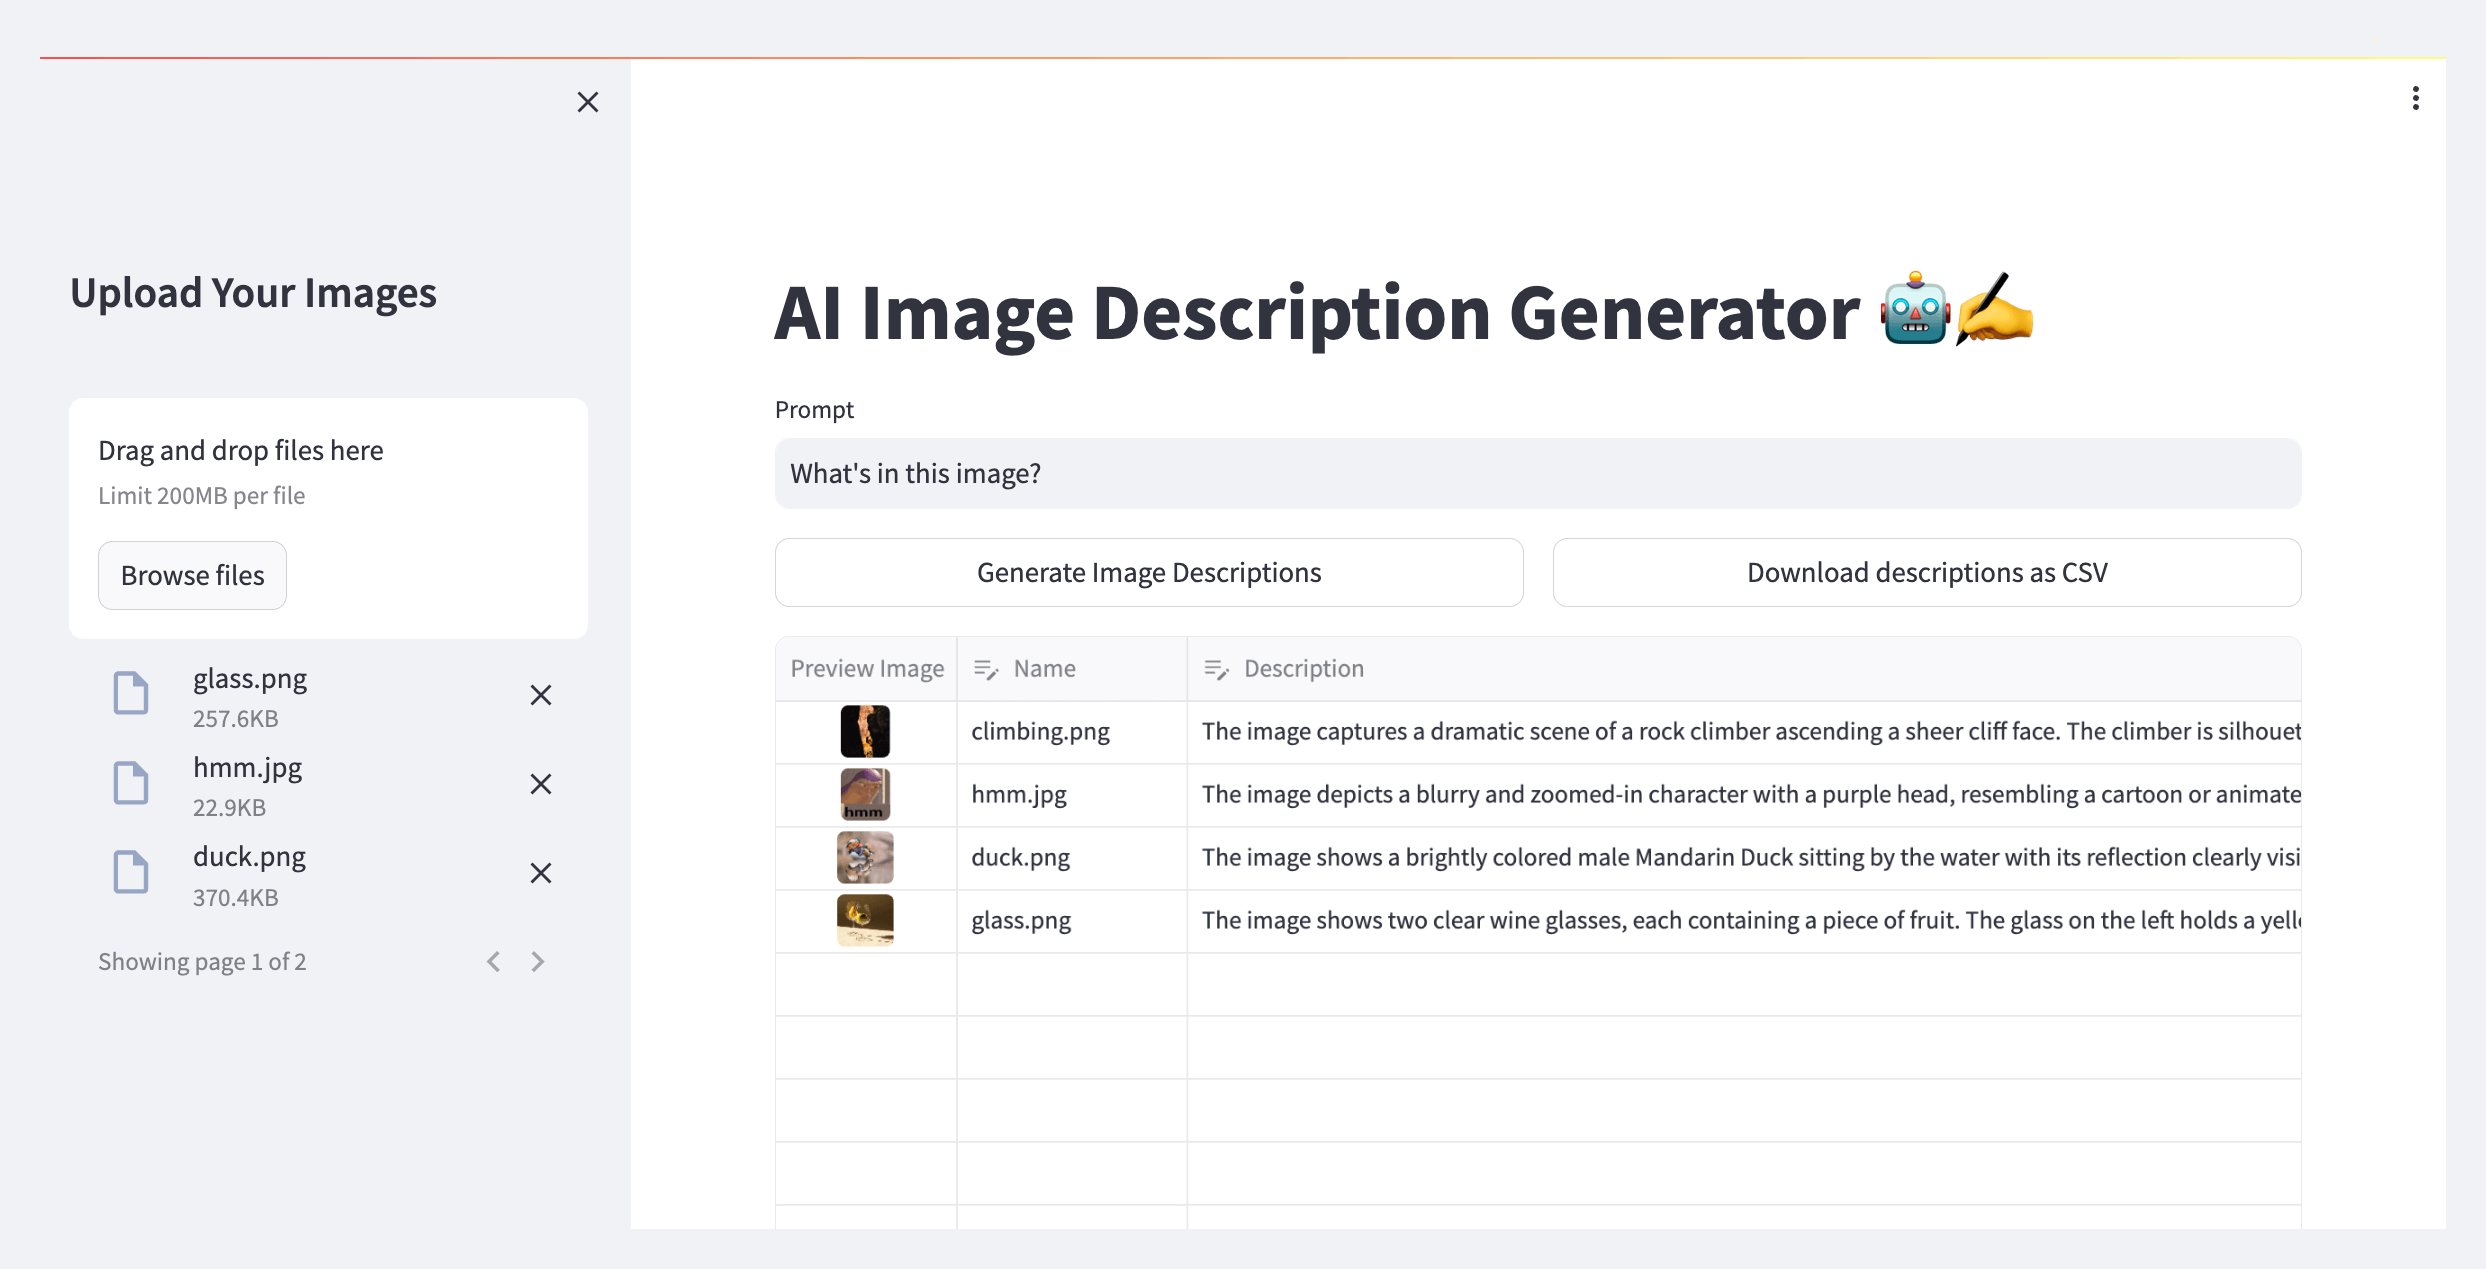
Finally, we will call the render_df function to render the DataFrame in the table. The DataFrame will always be rendered if there are images uploaded.
At this point, the app is complete. But we can do better! Let’s adjust the code to make less API calls and save some costs.
Bonus Section: Saving Costs 💰
The current implementation calls the OpenAI API for each image, even if its description has already been generated. To improve that, need to change two places in the code.
First, we need to modify the generate_df function, so when the user uploads more images, the descriptions of the images that have already been generated are not lost. We do that by merging the current DataFrame, containing all the images including the new ones, with the previous DataFrame. If the image is already in the DataFrame, we keep the description. If it’s a new image, we add it to the DataFrame.
def generate_df():
    current_df = pd.DataFrame(
        {
            "image_id": [img.file_id for img in st.session_state.images],
            "image": [to_base64(img) for img in st.session_state.images],
            "name": [img.name for img in st.session_state.images],
            "description": [""] * len(st.session_state.images),
        }
    )

    if "df" not in st.session_state:
        st.session_state.df = current_df
        return

    new_df = pd.merge(current_df, st.session_state.df, on=["image_id"], how="outer", indicator=True)
    new_df = new_df[new_df["_merge"] != "right_only"].drop(columns=["_merge", "name_y", "image_y", "description_x"])
    new_df = new_df.rename(columns={"name_x": "name", "image_x": "image", "description_y": "description"})
    new_df["description"] = new_df["description"].fillna("")

    st.session_state.df = new_df
Second, we need to modify the update_df function to call the generate_description function only for the images that don’t have a description yet.
def update_df():
    indexes = st.session_state.df[st.session_state.df["description"] == ""].index
    for idx in indexes:
        description = generate_description(st.session_state.df.loc[idx, "image"])
        st.session_state.df.loc[idx, "description"] = description
Much better! Now the app will only call the OpenAI API for the images that don’t have a description yet. This will save some costs and make the app more efficient 🏎️.
Full Code
Expand to see the full implementation...
Possible Improvements
- Add a loading spinner while the descriptions are being generated.
- Allow to generate descriptions for images from a URL.
- Allow the descriptions to be re-generated when the prompt is changed.
- Allow the user to select the maximum number of tokens to be generated.
- Resize the images to a smaller size to make the API calls faster.
Conclusion
In this post, we learned how to create a Streamlit app to generate image descriptions using the OpenAI GPT-4 Vision model. We also learned how to optimize the app to save costs and make it more efficient.
I hope you enjoyed this post and learned something new. If you have any questions or suggestions, feel free to leave a comment below. I would love to hear from you!
See you in the next post! 👋

