
This tutorial presents how I used DreamBooth from Google Research’s paper DreamBooth: Fine Tuning Text-to-Image Diffusion Models for Subject-Driven Generation. To train a Generative AI model able to create images of myself.
The paper presents itself as:
It’s like a photo booth, but once the subject is captured, it can be synthesized wherever your dreams take you…
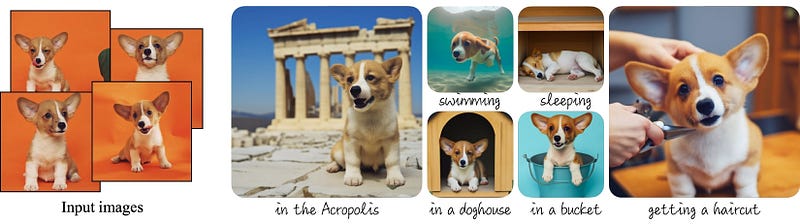 Examples of images generated by DreamBooth
Hugging Face 🤗, known for making machine learning models accessible, incorporated DreamBooth into their ecosystem in September this year. That was a game changer in terms of the usability of DreamBooth.
Steps for training the model
The whole process was quite straightforward once I found a notebook that works fine. The Generative AI field has been evolving fast in the last couple of months, and because of that, many implementations are outdated or simply broken due to dependencies that have changed.
The notebook I originally used which worked for me was the one implemented by ShivamShrirao. You can find it here.
For this tutorial, we will use a fork I made from ShivamShrirao’s notebook. My notebook is simpler and focuses on creating human images. If you want to learn how to save your model, or how to generate images with animals or other objects, I suggest you read ShivamShrirao’s notebook.
I split the training and inference of the model into five steps. Let’s dive into them now!
1. Create a Hugging Face account
We are going to use models that are hosted on Hugging Face. To be able to download them, we need an account. You can create one here.
With the account created, go to your profile picture → Settings → Access Tokens and generate a new token. We will need this token later to download the model from the notebook. A Read token is enough for this tutorial.
2. Create the dataset with your images
For my dataset, I used 16 different images of myself. I followed the guidelines from John Penna’s notebook.
WARNING: Be sure to upload an even amount of images, otherwise the training inexplicably stops at 1500 steps.
2–3 full body
3–5 upper body
5–12 close-up on face
The images need to be standardised. The model expects the input to be 512×512px. For standardising my images I used a web tool called Birme. After uploading my pictures to Birme, I ensured that my face was in the center of each image. Then, I downloaded them as a zip file.
3. Open the project on Google Colab
To use Colab you need a Google account. Once you are logged into your account, it is time to open the project.
To open the notebook on Google Colab, go to the README page of the project and click on the button Open in Colab. Or click here.
4. Run the notebook cells until the model training section
Run the cells one by one by pressing shift+enter, or clicking on the play button on the left side of each cell. There are a few cells you need to pay extra attention to, they are.
-
Login to Hugging Face 🤗
Before running this cell, you need to do two things: - 1. Visit the model repository, read the license, and tick the license checkbox if you agree. The model won’t download otherwise.
-
2. Copy the Hugging Face access token generated in Step 1 and paste it into the HUGGINGFACE_TOKEN field. Run the cell after that.
- Upload the images
After running this cell, a button written Choose files will appear. Click on it and select the images you want to use for the training.
Once the upload is complete, you should see your images inside the folder data/ukj in the Files panel on the left side.
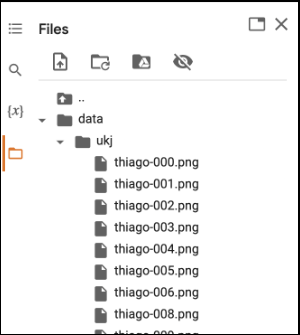 Images uploaded to the folder data/ukj
- Run the training
You can tweak the parameters for the training before running this cell. With the default parameters, the training takes ~20min.
5. Running the inference to generate new images
The inference section of the notebook has a few parameters that will impact the results in different ways, the parameters are:
- prompt: the images generated will be based on this text input. You can find examples of inputs in the next section of this tutorial. What is important for the prompt is that the person learned by the model is referred to as
ukj person. For example, if you want to insert yourself in the Matrix movie you can write the following prompt.
Movie still of ukj person as Morpheus from The Matrix (1999).
- num_samples: how many images to be generated.
- guidance_scale: the Hugging Face’s user ghpkishore gave a nice explanation of what this parameter means here.
The more it is the more closely it follows the prompt. However, after a certain value it becomes random. Think of it like weights for the prompt. Increasing guidance makes generation follow more closely to the prompt
- num_inference_steps: from the diffusers documentation:
In general, results are better the more steps you use, however the more steps, the longer the generation takes.
- height and width: These parameters define the size of the generated image.
- seed: The seed ensures the reproducibility of your prompt. By using different seeds for the same prompt, you will get different results.
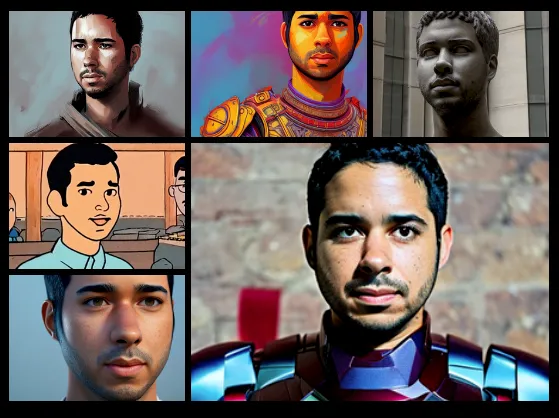
Examples of generations
The images below are the results I obtained after training my model. I found the inspirations for the prompts from the Corridor Crew Is This The Death of VFX? and from this blog post.
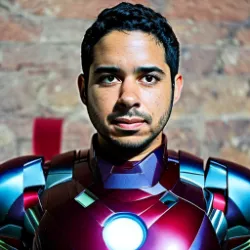
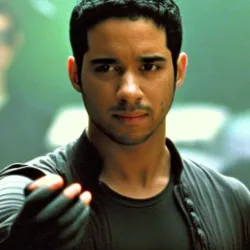
Prompt: Movie still ukj person as Iron Man from The Avengers.
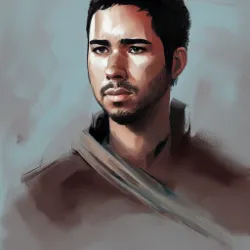
Prompt: A digital painting of a warlord, Greg Rutkowski, ukj person
Prompt: Movie still ukj person as Morpheus from The Matrix (1999).
Prompt: Portrait of ukj person as a cartoon from the The Adventures of Tintin

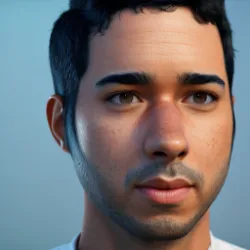
Prompt: Portrait of ukj person as a 3d model
Conclusion
I must say that I wasn’t expecting the results to be so good. The amount of information these models can extract from a few images is incredible.
It learned small nuances of my face that are almost imperceptible, such as spots where my beard didn’t grow. I also saw images where I had my t-shirt misplaced the same way it was on two images of the training set, which is mind-blowing for me.
Other resources and inspirations
- The youtube channel Aitrepreneur
- The notebook from Joe Penna
- Guido Appenzeller’s post
- Is This The Death of VFX? video
I usually published the results of my experiments on my LinkedIn first. If you want to see the next ones first hand, let’s connect!


